I have quickly learned in my cut flower research that in order to have the most productive spring flush of flowers for creating stunning bouquets you must start from seed indoors during the winter months (I began seeds the first weekend on December). Learning to start flowers from seed has been quite the learning curve on my part, but it has been a fun adventure.
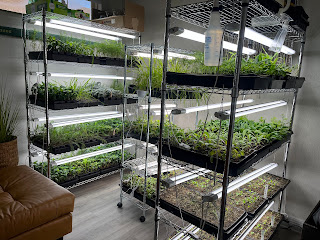
The Barker family “office” has been many things… A TV room, exercise room, storage room, and I am pleased to say that it is now a “grow room” (my hope for the future of course is to have an actual green house). To my surprise, I was able to start around 1,400 seedlings between the months of December and March in this tiny 10×10 room. I carefully planned for the spring flowers by deciding first on my color pallets. Once I had a color scheme I created a spreadsheet that outlined what I needed to start, how many seeds I should start, and when to start. I also created a “succession” schedule so I would have seedlings at a variety of growth stages by the time spring hit to give me a constant flow of fresh flowers. Overall, I started on a handful of larger focal flowers, smaller filler flowers, and a good selection of greenery to serve as bouquet fillers.
So far I have started:
Eucalyptus
Dusty Miller Candican
Snap Dragons (many varities and colors)
Sweet Annie
Yarrow
Campanula
Quaker Grass
Zinnia (many varities and colors)
Cosmos (many varities and colors)
Celosia (many varities and colors)
Amaranth (many varities and colors)
Gomphrena
Stock
Strawflowers
Managing over a thousand seed starts required quite the organization on my part. I created spreadsheets to help me stay on track. Most of my work was done on the weekends when I was not “working.” However, I quickly found that once I started the seedlings I had a daily obligation to check their status. Once the seedlings took off they required at least a weekly watering. It is best to “bottom water” which means that I lugged each one of the seed trays to my kitchen island to fill the bottom tray with water and allow the roots to soak it up. I soon found that the seedlings required additional nutrients, so I added a fish fertilizer to the weekly watering process (you can only imagine what this made the house smell like). In order to maintain this process I found myself evening upon evening after a long day of teaching middle schoolers lugging half a dozen trays back and forth from the “office” to the kitchen. This was my labor of love from December until March. I will say it again D-A-I-L-E-Y I was checking in and maintaining my little loves. This process defiantly is not for the faint of heart.


My fancy spreadsheets that kept me on track
I was literally counting down the days until I could put these babies in the ground, checking on them daily speaking positivity into the little green bundles of joy. Once March arrived and I had a “plant out” date in mind (otherwise known as a teacher’s Spring Break) the next step in the process began….hardening off. When I started this seeding process I had absolutely no idea that seedlings need to acclimate to their “outdoor” environment. I just figured these little things were made for outdoors….but I was wrong. When you start seeds in a protected environment like my cozy little grow room, you will have to slowly introduce the seedlings to the “real world.” This is referred to as hardening off. Once again, I found myself lugging 40 trays in and out of the house. I started on a Sunday, and allowed them to have about two hours of afternoon sun on my protected patio. I will continue to increase the outside time for the next few days until eventually I can leave them out all day and overnight. This slow, laborious process will hopefully allow them to adapt quickly and positively to their new home at Windy Hill Farm.

“Hardening Off” the seedlings before they go into the ground.
Jarret and I started prepping the grow site a couple weekends before our plant out date. We are using a landscape fabric for weed protection and water retention. The fabric is more affordable when it it purchased without the pre-cut holes for planting. So we did our research and found that we could burn the holes ourselves by using a torch and propane. This may seem over the top – but this is fabric that we can use for years. In fact, we hope to get a good ten years out of it. Because we will be using it for a long period of time I wanted to make sure we did it right. I had Jarret create a template for us to use out of plywood. We used to template to properly space out our plantings.


Burning holes in the landscape fabric
I cannot wait to start planting! We have a few more sections to lay out with landscape fabric and drip irrigation before we can proceed. I will update you again once we get all of the seedlings snuggled into their new home. Wishing you endless joy and blooming days ahead—until next time from our farm!
Ashley